


From Rough to Refined: The Ultimate Guide to Prepping Wood for a Flawless Stain
Whether you’re a professional joiner or a DIY enthusiast, the secret to a high-end finish isn’t the stain itself—it’s the prep. A beautiful stain highlights the natural soul of the wood, but it also highlights every scratch, swirl, and leftover bit of old paint.
If you want a professional-grade result that lasts, follow this step-by-step guide to prepping raw, stained, or painted timber.
- Evaluate Your Starting Point
Before you pick up the sandpaper, you need to know what you’re dealing with:
- Raw Wood: Needs a light sand and cleaning.
- Previously Stained: Requires stripping or heavy sanding to allow the new pigment to penetrate.
- Painted Wood: The most labour-intensive; all paint must be removed to open the wood pores.
- Stripping the Old Finish (For Painted or Heavily Varnished Wood)
If the wood is currently painted, you can’t just sand it off—you’ll gum up your sandpaper in seconds.
- The Pro Way: Use a high-quality chemical stripper. Apply it generously, let it “blister” the paint, and scrape it off with a blunt putty knife.
- The Alternative: A heat gun can peel back layers of old paint quickly, but be careful not to scorch the wood fibers.
- The Art of Sanding
Sanding isn’t just about making it smooth; it’s about opening the “pores” of the wood so it drinks in the stain.
- Step 1: Start Coarse. If you’re removing an old finish, start with 80-grit.
- Step 2: Graduate. Move to 120-grit, then finish with 180-grit.
- The Golden Rule: Always sand with the grain, never across it. Sanding across the grain leaves “pigtail” swirls that only become visible after you apply the stain.
Pro Tip: For a truly professional finish, use 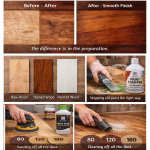 a bright work light held at a low angle across the wood. This reveals hidden scratches you might have missed.
- Deep Clean
Dust is the enemy of a smooth finish.
- Vacuum the surface using a brush attachment.
- Wipe the wood down with a tack cloth or a lint-free rag dampened with white spirit. This removes the microscopic particles that prevent the stain from bonding.
- Condition the Wood (The Secret Step)
Have you ever stained pine or cherry and ended up with “blotchy” dark spots? That’s because softwoods absorb stain unevenly.
- The Fix: Apply a Pre-Stain Wood Conditioner. It acts as a sealer that regulates absorption, ensuring your “Walnut” stain looks like Walnut, not a series of dark puddles.
- Dealing with Edges
Since you’re at Edging Tapes and DIY, don’t forget the “raw” edges of plywood or MDF projects.
- Iron-on Edging: Apply your matching wood veneer edging tape before the final sanding stage.
- Sand Flush: Once the tape is applied, lightly sand the transition between the tape and the surface so the stain flows seamlessly across the joint.
Summary Checklist for a Flawless Finish
| Step | Action | Why? |
| Strip | Remove paint/varnish | Opens the wood pores. |
| Sand | 80 Grit – 120 Grit – 180 Grit | Creates a uniform surface. |
| Clean | Vacuum & White Spirit | Removes finish-ruining dust. |
| Condition | Apply Pre-Stain | Prevents blotchiness on softwoods. |
| Stain | Apply in thin, even coats | Build color depth gradually. |